Lens calibration for Lensfun
| Date: | 2015/11/04 |
|---|---|
| Author: | Torsten Bronger <bronger@physik.rwth-aachen.de> |
Note
Contact me via mail at bronger@physik.rwth-aachen.de or via Jabber/XMPP/GoogleTalk at torsten.bronger@jabber.rwth-aachen.de if you have questions, suggestions, or problems concerning this tutorial.
Contents
The big picture
All photographic lenses have different types of errors. Three of them can be corrected by software almost losslessly: distortion, transverse chromatic aberration, and vignetting. The Lensfun library provides code to do these corrections. Lensfun is not used by the photographer directly. Instead, it is used by software such as Darktable, Rawstudio, UFRaw, digiKam, ImageMagick, and others. For example, you import a RAW into Darktable, Darktable detects the lens, focal length, and f number used for this photograph, and it then calls Lensfun to automatically rectify the photograph. Great, isn’t it?
Lensfun uses a database to know all the parameters needed to do the lens corrections. This database is filled by photographers like you, who took time to calibrate their lenses and to submit their findings back to the Lensfun project. If you’re lucky, your lens models are already included. If not, please use this manual to do the calibration and contribute your results. You help yourself and others.
Okay, let us assume your lens model isn’t yet covered by Lensfun, or not good enough. The following sections show you how to create an entry of your own. Note that you needn’t do all of this. Do whatever your spare time allows. Lensfun is very flexible.
Note
I set up a lens calibration service. If you don’t want or cannot do the calibration but at least can take the calibration pictures, upload them there.
Preparations
The following procedure is tested on Ubuntu. However, it should work on any system where Python3, Numpy + SciPy, ImageMagick, dcraw, Hugin, and exiftool are properly installed.
Download the Python script calibrate.py. It takes a bunch of photographs plus a control text file and creates the Lensfun data entries automatically.
Create a directory where your calibration files should reside. Eventually, it will have the following structure:
root directory
     |
     +---> lenses.txt
     |
     +---> distortion
     |       \
     |        `--> a lot of RAWs
     |
     +---> tca
     |       \
     |        `--> a lot of RAWs
     |
     +---> vignetting
             \
              `--> a lot of RAWs
The file lenses.txt lists all lenses of your calibration session. It may look like this:
E 16mm F2.8: Sony, Sony E, 1.5
distortion(16mm) = 0.01701, -0.02563, -0.0052

E 18-55mm F3.5-5.6 OSS: Sony, Sony E, 1.5
distortion(18mm) = 0.02897, -0.08920, 0.03513
distortion(19mm) = 0.05477, -0.18267, 0.1583
distortion(20mm) = 0.02164, -0.05738, 0.01945
distortion(24mm) = 0.01405, -0.02629, 0.00229
distortion(30mm) = 0.01175, -0.02135, 0.02549
distortion(35mm) = 0.00822, -0.00590, 0.00973
distortion(55mm) = 0.00220, -0.00232, 0.01446
Every lens entry begins with a line
<lens name>: <maker>, <mount>, <cropfactor>, <type>
“lens name” and “maker” must match exactly the spelling in the EXIF data. “type” is “fisheye” for fisheye lenses and is omitted otherwise.
Normally, you don’t have to type everything in lenses.txt yourself, see the section “Distortion”.
EXIF trouble
If your RAWs don’t contain their proper lens model name, focal length, and/or aperture in their EXIF data, you can put it in the file name instead. For example, you may rename to
Canon_EF_24-70mm_f__2.8L_USM--35mm--2.8.CR2
In the lens name, the following substituions apply, since some characters that occur in lens names are not allowed in (Hugin) filenames:
| substitute | original character in lens name |
|---|---|
| _ (single underscore) | “ ” (space) |
| __ (double underscore) | / |
| ___ (triple underscore) | : |
| ## | = |
| ++ | * |
Distortion
Measuring lens distortion with Hugin.
First, have a look at the screencast at Vimeo. It gives you an overview. Additionally, it demonstrates how to do the actual calibration with the Hugin panorama stitcher. Unfortunately, the video refers to an older version of Hugin. Since 2014, Hugin uses a different user interface. If you know Hugin, you probably are able to map the workfow to the new UI.
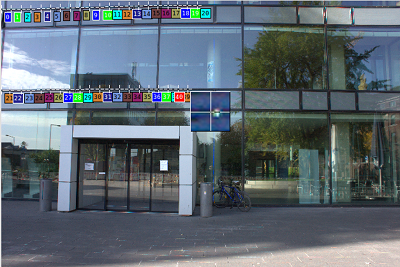
Take the test photographs [1]. Put the RAWs in the directory distortion/. If you don’t have a lenses.txt yet, call calibrate.py from the root directory. It will generate a template lenses.txt file, plus TIFFs from all RAW files in distortion/ ready-to-be-used for Hugin. Complete the lens lines in lenses.txt.
Now use Hugin to do the calibration as shown in the screencast, and copy-and-paste the resulting values for (a), (b), and (c) into lenses.txt.
Repeat this for every lens. For zoom lenses, repeat this for every focal length that you calibrate.
Chromatic aberration (TCA)
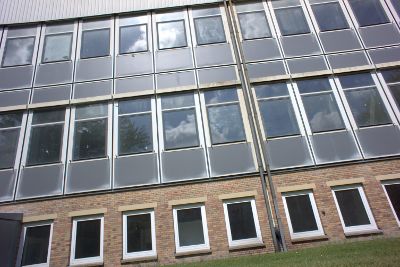
Good example of an object for TCA calibration.
Look for a large object with sharp high-contrast edges throughout the image. Preferably, the edges should be black–white but anything close to that is sufficient. Assure that there are such edges in the corners, too. In many cases, you can use the very same pictures for distortion and chromatic aberration correction, but TCA doesn’t need the straight lines.
You should take your pictures being at least 8 metres away. For zoom lenses, take pictures at the same focal lengths as for distortion. Take really sharp pictures.
Put the RAWs in the directory tca/.
Vignetting
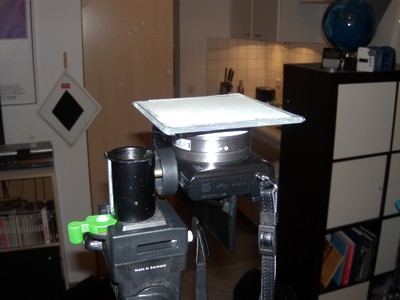
Example setup for vignetting measurement.
Never use a monitor for vignetting measurements!
You need a diffuser in front of the lens. This may be translucent milk glass, or white plastic foil. Whatever, as long as it is opaque enough so that nothing can be seen through it, yet transparent enough so that light can pass through it. It must not be thicker than 3 mm. It shouldn’t have a noticeable texture. It must be perfectly flush with the lens front, and it mustn’t be bent. It must be illuminated homogeneously.
As an example, my own diffuser was white plastic foil taped on a piece of ordinary glass for stability. I illuminated the ceiling of my room with an uplight, pointed the camera upwards and put the foil without a gap on the lens. Then I took the pictures.
Switch your camera to RAW mode. Make sure that no corrections are applied by the camera (some models do this even for RAWs). Set the camera to “aperture priority” and the lowest ISO. Switch on manual focus.
Focus at infinity. (Despite the foil directly in front of the lens.) Take pictures at maximal aperture and at three smaller apertures in 1 stop distance, and at the minimal aperature. For zoom lenses, take pictures at five focal lengths. This makes 5 pictures for primes and 25 for zooms.
Put the pictures in vignetting/.
Vignetting correction for the really diligent
(I don’t recommend doing the following because the gain in accuracy is really very small for the lenses I’ve seen so far.)
Lensfun can correct vignetting depending on distance. Thus, you can achieve a little bit more accuracy by shooting at different distances. Additionally to focus at infinity, repeat the procedure with focus at the near point [2]. Further senseful distances are near point times 6 and near point times 2, in this order. This means up to four different distances. But again: This is not necessary. If it sounds too tedious to you, shooting at infinity is sufficient.
Put pictures for distances other than infinity in vignetting_<distance>/. For example, pictures for 20 cm belong in vignetting_0.2/.
For every focal length/aperture/distance triplett, you can take more than one picture, possibly with moving the foil a bit or with tilting the camera a bit. calibrate.py will detect such equivalent pictures, and will take the average.
Bringing it together
Now, call calibrate.py from the root directory. Wait. For a long time.
The result is a lensfun.xml file. Install it locally according to How database files are found and loaded. Check that there is also an entry for your camera and lens mount. The Lensfun manual shows an example file.
Important
Send your lensfun.xml to one of the Lensfun maintainers! Thank you!
| [1] | If you cannot get a picture of a building in your vicinity, don’t worry. Most lenses don’t need the full 8 metres of distance. What really matters are the long straight lines. But avoid anything closer than one metre. |
| [2] | The near point is the closest distance that can be brought in focus. |